How to Solder LED Strips: A Step-by-Step Guide
LED strips are a popular choice for DIY lighting projects. Soldering is an essential skill for connecting wires to LED strips. In this guide, we’ll cover the step-by-step process for soldering LED strips.
What temperature do you solder LED strips?
The recommended soldering temperature for LED strips is around 350°C to 400°C (662°F to 752°F). However, it’s important to note that different types of soldering irons may have different temperature settings, and the appropriate temperature may also depend on the specific type of LED strip and the soldering technique being used.
How to solder LED strips DIY?
Gather Your Materials
Before starting, ensure that you have all the necessary materials and tools to complete the project. Here is a list of items required:
- LED Strips
- Soldering Iron
- Solder
- Wire Cutters
- Heat Shrink Tubing
Cutting LED Strips
It is essential to cut LED strips at designated cut points to avoid damage to the circuitry. Follow these steps for cutting LED strips:
- Use wire cutters to cut LED strips to the desired length.
- Ensure that you cut at designated cut points.
- Use caution to avoid bending or damaging the strip.
Preparing Wires
Preparing wires is an important step in soldering LED strips. Follow these steps for preparing wires:
- Cut two pieces of wire to the desired length for each connection.
- Strip 1/4 inch of insulation from each end of the wire.
- Twist the exposed wires together to form a tight connection.
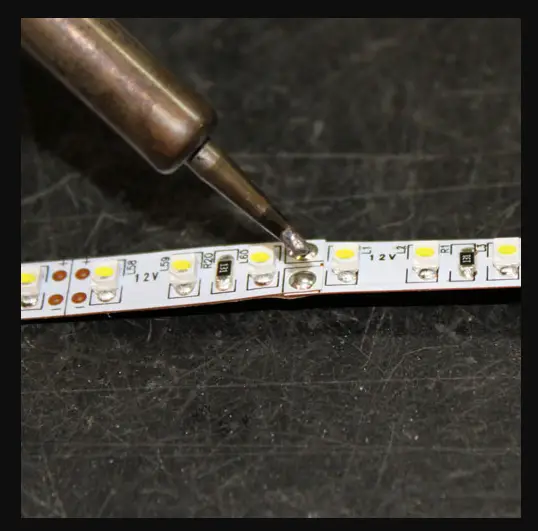
Soldering LED Strips
Soldering is a crucial step in connecting wires to LED strips. Follow these steps for soldering LED strips:
- Heat the soldering iron for a few minutes.
- Apply solder to the tip of the soldering iron.
- Place the tip of the soldering iron on the twisted wire and apply solder to the wire.
- Apply solder to the LED strip pads.
- Connect the twisted wire to the LED strip pads.
Heat Shrink Tubing
Heat shrink tubing is a useful tool for covering and securing the soldered connection. Follow these steps for applying heat shrink tubing:
- Cut a piece of heat-shrink tubing to the desired length.
- Slide the tubing over the soldered connection.
- Use a heat gun or lighter to heat the tubing until it shrinks and covers the connection.
How to solder led strips to wire?

Soldering LED strips to wire is a common task when working on DIY lighting projects. It involves connecting the wires to the LED strip’s contact pads using a soldering iron and solder. Here’s a step-by-step guide on how to solder LED strips to the wire:
Materials Needed
- LED strip
- Wire
- Soldering iron
- Solder
- Wire cutters
- Heat shrink tubing
Steps
- Cut the LED strip to the desired length using wire cutters. Ensure that you cut at the designated cut points.
- Cut two pieces of wire to the desired length for each connection. Strip about 1/4 inch of insulation from each end of the wire.
- Twist the exposed wires together to form a tight connection. This will make it easier to solder the wires to the LED strip.
- Heat up the soldering iron and apply a small amount of solder to the tip of the iron.
- Place the tip of the soldering iron on the LED strip’s contact pad and heat it up for a few seconds until the solder melts.
- Hold the twisted wire against the contact pad while the solder is still molten, and then remove the soldering iron. Be sure to hold the wire in place until the solder cools and solidifies.
- Repeat the process for the other wire and the other contact pad.
- Slide a piece of heat shrink tubing over the soldered connection, covering both the wire and LED strip pad.
- Use a heat gun or lighter to heat the heat shrink tubing until it shrinks and covers the connection.
- Repeat the process for each connection.
By following these steps, you can solder LED strips to wires properly. It’s essential to use the right tools and techniques to avoid damaging the LED strip’s circuitry or creating a weak connection. With a little practice, you can create custom lighting setups that are safe and stylish.
How To Cap Off Electrical Wires?
rlc talk
How to solder 2 led strips together?
Soldering two LED strips together is a common task in DIY lighting projects that require longer lengths of LED strips. It involves connecting the contact pads of one LED strip to the contact pads of another LED strip using a soldering iron and solder. Here’s a step-by-step guide on how to solder 2 LED strips together:
Materials Needed
- Two LED strips
- Soldering iron
- Solder
- Wire cutters
- Heat shrink tubing
Steps
- Cut both LED strips to the desired length using wire cutters. Ensure that you cut at the designated cut points.
- Identify the contact pads on each LED strip. They are usually located at the end of the strip and are marked with “+” and “-” signs.
- Cut two pieces of wire to the desired length for each connection. Strip about 1/4 inch of insulation from each end of the wire.
- Twist one wire around the “+” contact pad of one LED strip and the other end around the “+” contact pad of the other LED strip. Repeat the process for the “-” contact pads, using the second wire.
- Heat up the soldering iron and apply a small amount of solder to the tip of the iron.
- Place the tip of the soldering iron on one of the twisted wires and the corresponding contact pad. Heat it up for a few seconds until the solder melts.
- Hold the wire against the contact pad while the solder is still molten, and then remove the soldering iron. Be sure to hold the wire in place until the solder cools and solidifies.
- Repeat the process for the other wire and contact pad.
- Slide a piece of heat shrink tubing over the soldered connection, covering both the wire and LED strip pads.
- Use a heat gun or lighter to heat the heat shrink tubing until it shrinks and covers the connection.
- Repeat the process for the other set of contact pads.
By following these steps, you can solder two LED strips together to create longer lengths of LED strips. It’s essential to use the right tools and techniques to avoid damaging the LED strip’s circuitry or creating a weak connection. With a little practice, you can create custom lighting setups that are safe and stylish.
How to solder waterproof led strips?
Soldering waterproof LED strips can be a bit more challenging than regular LED strips because the waterproof coating can make it difficult to access the contact pads. However, with the right techniques and tools, you can still solder waterproof LED strips. Here’s a step-by-step guide on how to solder waterproof LED strips:
Materials Needed
- Waterproof LED strip
- Soldering iron
- Solder
- Wire cutters
- Heat shrink tubing
- Razor blade or utility knife
- Rubbing alcohol
Steps
- Cut the waterproof LED strip to the desired length using wire cutters. Ensure that you cut at the designated cut points.
- Use a razor blade or utility knife to carefully scrape away a small section of the waterproof coating around the contact pads. Be careful not to cut into the circuitry or damage the contact pads.
- Clean the exposed contact pads with rubbing alcohol and a cotton swab to remove any dirt, grime, or waterproof residue.
- Cut two pieces of wire to the desired length for each connection. Strip about 1/4 inch of insulation from each end of the wire.
- Twist one wire around the “+” contact pad and the other wire around the “-” contact pad.a
- Heat up the soldering iron and apply a small amount of solder to the tip of the iron.
- Place the tip of the soldering iron on one of the twisted wires and the corresponding contact pad. Heat it up for a few seconds until the solder melts.
- Hold the wire against the contact pad while the solder is still molten, and then remove the soldering iron. Be sure to hold the wire in place until the solder cools and solidifies.
- Repeat the process for the other wire and contact pad.
- Slide a piece of heat shrink tubing over the soldered connection, covering both the wire and LED strip pads.
- Use a heat gun or lighter to heat the heat shrink tubing until it shrinks and covers the connection.
- Repeat the process for each connection.
By following these steps, you can solder waterproof LED strips without damaging the waterproof coating or circuitry. It’s important to take extra care when scraping away the coating and cleaning the contact pads to ensure a strong and reliable connection. With a little practice and patience, you can create custom lighting setups that are both waterproof and stylish.
Removing Insulation From Wire; All You Need To Know
rlc talk
Conclusion
Soldering LED strips is a useful skill for DIY lighting projects. It’s essential to follow the proper steps for a secure and proper connection. Ensure that you have all the necessary tools and materials before starting the project. By following this step-by-step guide, you can create a custom lighting setup that adds ambiance and style to your home.